This describes modifications I’ve made to the Midi2Cat package from Andrew Mansfield, M0YGG, as of this date. They should appear in the next release of OpenSDR/PowerSDR mRX PS (hereafter referred to simply as OpenSDR). They were first applied to version 3.3.16, which may, in fact, be the next release. The new features provide special handling for messages produced by two MIDI controllers from Behringer: the CMD PL-1, and now also the CMD Micro.
Although MIDI is a standard of sorts, the messages from controllers such as these can vary widely. The original code worked well with the Hercules controllers, and to a limited degree, with some of the controls on the Behringer units. That function has been preserved in this new version. In fact, it is possible to use more than one of these controllers together, connected at the same time.
For complete instructions on setting up MIDI controllers using the Midi2Cat package, see M0YGG’s original document, usually found in the OpenSDR package, with a file name such as “Midi2Cat Instructions V3.” This posting, and the corresponding document in the new release, are each intended to be an addendum to those instructions, adding details on how to use the package with the Behringer controllers.
Setup Process
Setting up the various controls works as it did before in OpenSDR. This means that the MIDI setup dialog window still works as before, and you get a tab labeled properly as “CMD PL-1,” or “CMD Micro”, similar to how it works with the Hercules. The mapping procedure is mostly unchanged for the Behringer controllers, with some minor exceptions described below.
Main Wheel
The PL-1 main wheel is big and very smooth, so it works great as a tuning knob. For example, you can set it to control a VFO—the most obvious mapping and probably the most useful. If you do, the program makes use of the wheel’s speed sensitivity to change the VFO tuning rate in three steps: slow, medium, and fast. It transitions through the speeds gradually as you turn faster. If you give it a good spin you’ll fly across the band, and if you turn it slowly you’ll fine-tune the radio using the step size defined in the OpenSDR window. By default, the wheel’s sensitivity to touching its top surface is not used. It’s always possible to touch the top surface accidentally while tuning, causing something else to happen inadvertently, so it probably is best left unmapped. All of this is true also for the two large wheels on the Behringer CMD Micro.
To program a large wheel, go through MIDI setup as usual, spinning it clockwise and counterclockwise. The max/min numbers won’t matter because to get the speed sensitivity, the program reads the all the reported values anyway and does the right thing. If you plan to use the single large PL-1 wheel for both VFOs, first program it for VFOA, then follow the instructions in the next section for setting it up for VFOB. If you’re programming the two large wheels on the Micro, just follow the above instructions for each VFO, one at a time.
For the PL-1, there is a new CAT function called “Toggle Wheel to VFOA/VFOB.” You can map this function to any of the buttons. It is used to toggle the function of the PL-1’s main wheel between controlling VFOA and VFOB. To set this up properly you need to do it in the following order:
- In MIDI Setup, map VFOA to the main wheel as above.
- Map a button of your choice to the “Toggle Wheel to VFOA/VFOB” function.
- Save and exit MIDI Setup.
- Press the button you just mapped in step #2 once (and only once) to switch to VFOB.
- Go back into MIDI setup.
- Map VFOB to the wheel, which behaves now as a different control from that in step #1.
- Save and exit setup.
- Have fun.
Small Knobs
The small knobs on the Behringer CMD PL-1, and the center knob on the Micro, all behave like mini-wheels (they keep turning without limit) instead of knobs as OpenSDR defines them and is expecting knobs to behave, i.e. with limits and values like a slider or potentiometer. That’s why OpenSDR lumps knobs and sliders together. So when you program a PL-1 knob, you have to choose “Wheel” as the control type in the MIDI setup. You can map any mini-wheel to anything in the OpenSDR UI that makes sense. That is, it can be used to control anything that has a value that changes continuously, whether or not that value has limits in the OpenSDR window, such as on sliders.
In addition to handling messages from the Behringer controllers send to the computer, messages are sent back to the controller that activate certain LEDs on the PL-1, such as those around each knob and alongside the single slider, and make them do something sensible. As you rotate the knobs or slide the slider, the LEDs light up roughly corresponding to a percentage of the specific function’s setting, somewhere between its minimum and maximum values. At this time, this feature works for AF gains, AGC gains, RIT/XIT, drive level, CW speed and some others.
When RIT or XIT is mapped to a PL-1 mini-wheel, the LEDs behave a bit differently. First, the center (midpoint) LED lights only when the RIT/XIT is set to exactly zero. Then, the counterclockwise and clockwise LEDs light depending on how much you turn the knob. Despite the wide range of settings possible in OpenSDR, the LEDs will only indicate a maximum of plus or minus 2 kHz. (I found that if it took in a wider range, they changed too slowly to have any meaning.) Note: you can still keep turning the knob and go well beyond 2 kHz to the limits of OpenSDR, but the LEDs will hit their maximum and minimum indication at 2 kHz or slightly less.
For most of the mappings of mini-wheels to on-screen user interface (UI) slider controls in the OpenSDR window, the LEDs also react to changes made on screen. For example, if you map a PL-1 knob to the RX1 AF Gain, then slide the on-screen RX1 AF slider in the OpenSDR window, the LEDs on the PL-1 will change just as if you were turning the PL-1 knob.
The second feature of these mini-wheel knobs is that they act as buttons when you push down on them. So you can map them as buttons. For RIT/XIT this is done for you so when you push a mini-wheel mapped to RIT or XIT, it zeros the value of that control. You can, of course, map the RIT/XIT on/off function to any other button you like.
Buttons
The PL-1 and Micro buttons behave as usual—they produce messages when pressing down and springing back up. You map them just as with any other controller.
Some buttons are capable of changing from their default orange to one other color. So, you can add messages to make them do what you want, using the MIDI Setup Advanced options according to M0YGG’s instructions. To control colors on the PL-1, you just need to send back the same message as received, but change the value part of the message to a number, depending on what you want the button’s LED to do. For default orange, send 0 (0x00 – 00 hexadecimal); for the alternate color, send 1 (0x01), and to have it alternate or flash between the two colors, send 2 (0x02).
Thus, when you map, for example, a button, click on “Show Advanced Options” and you’ll see a window like the one below. In this example, I pressed the “CUE” button on the Micro, which brought up the window showing I had previously mapped it to the “Multi Rx On Off” function.
In the lower right, the two lower text boxes are where you enter these messages to control button lights. The Setup window lets you use “SS” and “YY” for the status and control ID bytes sent by the controller, instead of having to figure out what those values are and enter them explicitly.
The example shows what gets entered to toggle between flashing (SSYY02) and constant alternate color (SSYY01). To use the default orange color, the message would be SSYY00.
The buttons that can change color have only one alternate color. For example, the PL-1 CUE button can be pinkish-purple, Play/Pause can be green, and all the others can be blue; and on the Micro, only the Play/Pause and CUE buttons have alternate colors. OpenSDR changes some of them to their alternate color on startup for some initial variety. I think it looks better than all orange. I may make this customizable in Setup some time later. For now, you can use the built-in messaging (as above) to change color however you like.
As an example, I have my PL-1’s SCRATCH button mapped to toggle between VFOs. In MIDI setup, I entered a message to turn it blue for VFOA and orange for VFOB.
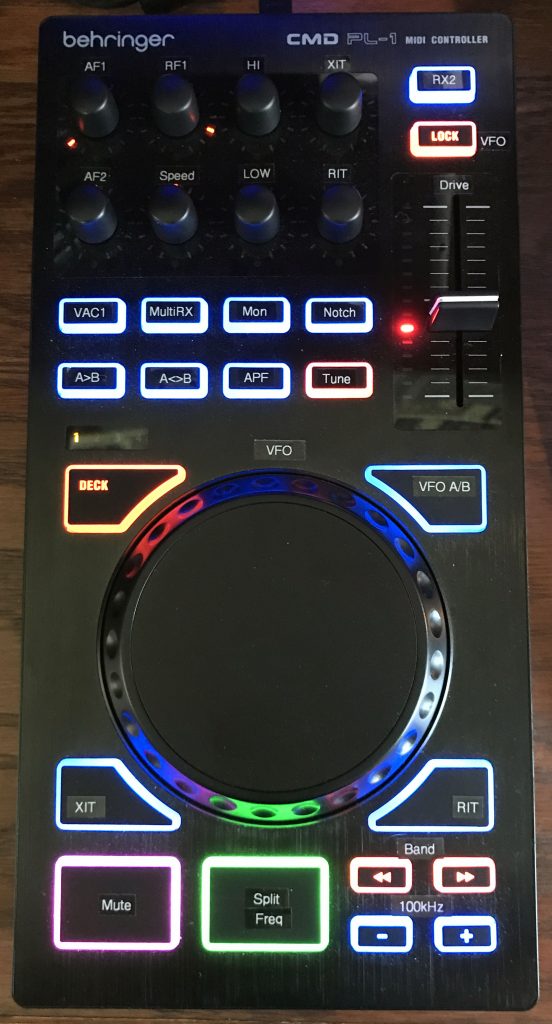
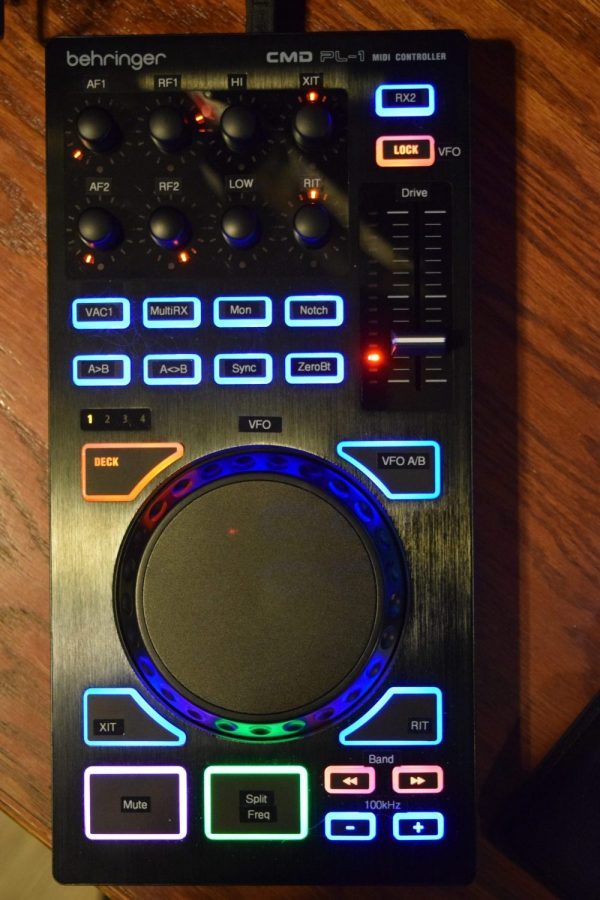
The photo shows examples of mappings and colors, and some labels appropriate for SDR use. This is the same as in the previous post. The knobs (mini-wheels) labeled “LO” and “HI” correspond to the filter low and high settings in OpenSDR, and basically behave like LowCut and HighCut knobs on Kenwood rigs. They’re quite intuitive to use with the panadapter. Turning Lo clockwise moves the lower filter edge up, and counterclockwise moves it down in frequency. Likewise for the Hi knob. These make slicing out adjacent QRM very easy.
PL-1 Slider
The PL-1 slider can be mapped in setup as a “knob or slider.” When you map it to an existing slider in the OpenSDR window, the LEDs follow the slider’s movement. One bit of quirkiness comes about because there is, of course, no way to physically move that slider under program control. Thus, if you change the slider in the OpenSDR window, the LEDs will change and become out-of-sync with the actual slider, until you move the PL-1 slider yourself. When you do, its value will jump instantly to the physical slider’s actual setting.
The knobs don’t have this problem. Since the PL-1 knobs (and the Micro’s center knob) are mini-wheels and have no absolute position (they just turn freely), there is no direct correspondence between knob position and value or slider position in the OpenSDR window, and so the quirkiness described above for the PL-1 slider’s LEDs isn’t an issue with the mini-wheels.
On the Micro, the sliders behave normally and have no LEDs.
Multiple Controllers
M0YGG’s original code nicely handles multiple controllers. The changes to handle the Behringer controllers have their effect only for the PL-1 and Micro. So mapping and using a Hercules controller, for example, should be unaffected. In fact, you can use both connected at the same time. You can also use both Behringer controllers at the same time.
Example CMD Micro mapping and labeling
de W2PA


 Buttons